Grunge it up card

Click on the image and see how this was made. There is a video tutorial of the process.

In My Garden card

Click on the image and see how this was made. There is a video tutorial of the process.

Timeless Treasure art journal spread

Click on the image and see how this was made. There is a video tutorial of the process.

Father's day card

Click on the image and see how this was made. There is a video tutorial of the process.

Distress it card

Click on the image and see how this was made. There is a video tutorial of the process.

Friday, September 30, 2011

Smashbook day 9: Cupcakes & Clothing

Hi bloggies (I love to call you that, hihi),

Todays theme is clothing and cupcakes.

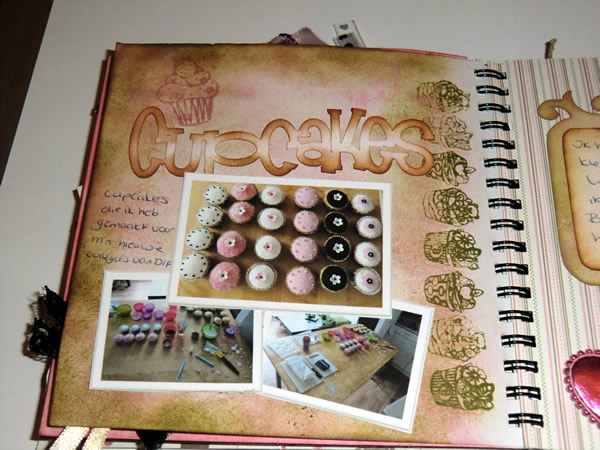
I'm not a kitchen pricess, but I love to make cupcakes and especially to decorate them. There are so many supplies to decorate them with and I want to have them all, haha. Everytime I make a batch they look better then the previous ones. It's easy to do and it looks like you're a pro with not much effort at all. The picture is taken from the last time I made cupcakes, and I think they look very cute and delicious :D.


The left page I distressed the background with distress ink (as usual ;)) and stamped with cupcake stamps.
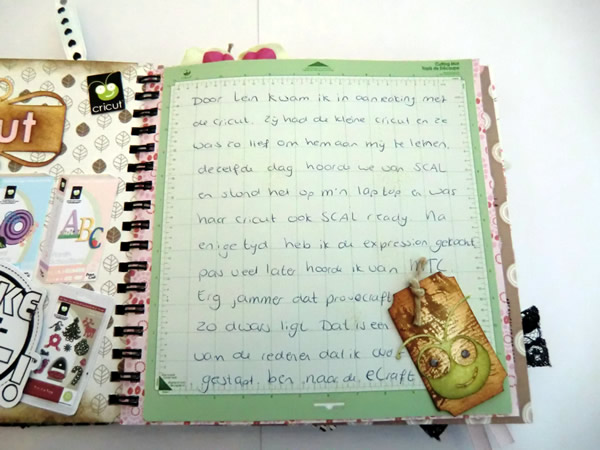
The letters I cut out with my eCraft and on the edges I used distress ink.


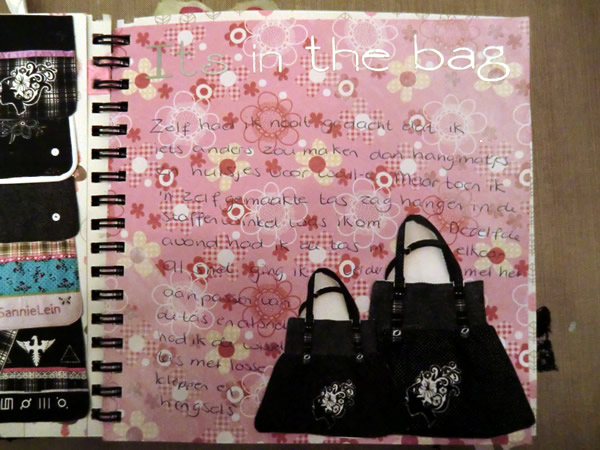
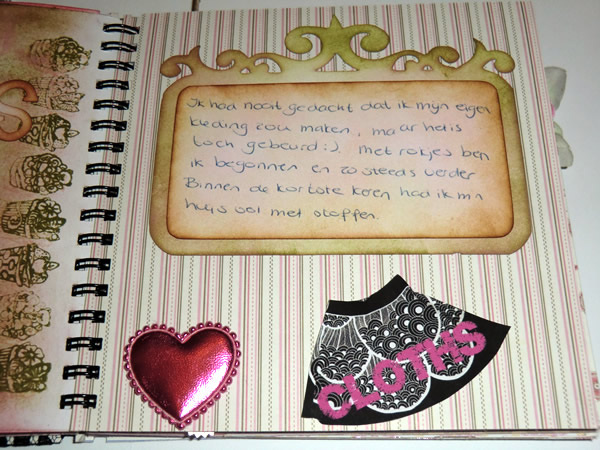
I never thought I would make my own clothes. I was afraid it would not be nice and not symmetrical, and look very home made. I started with a Burda pattern of a skirt. A very simple skirt ofcourse. It was quite a challenge. The first time making clothes is not easy and definitely putting a zipper in was a challenge. After a few skirts, I thought I could do a wintercoat with difficulty of 3 dots. The goal I set for myself was a bit too high. I still finished the coat, but I've recently given it away to charity. Hopefully I have made ​​someone happy with that coat. Maybe not such a bad idea to take sewing lessons! hahaha.

The picture  is of the second skirt (without the letters CLOTHS on it) I made. I think it's a beautiful skirt, but unfortunately I chose the wrong fabric for it. The fabric is too thick and too stiff, and is more for drapes or furniture.


Tomorrows theme is screenprinting!

See you tomorrow, right?
Sandra

Thursday, September 29, 2011

Smashbook day 8: My Craftroom

Hi bloggies,

Sorry I was a bit too busy yesterday, so that's why skipped a day. But today's theme is my craftroom. At first I had my craftroom / office in what's basically a storage room. My apartment has a "vide" (what literaly means empty space, and don't know the english word for it) and I have built an extra room in it, and now it's less empty space, lol:). The extra room is now my new craftroom. With the renovation I've created a room that's about 13 m2. It's like a paradise for me, and so very happy with it! My craftroom is well equipped, well I think it is :). It has a large desk where I can put lots of stuff on and cut fabrics and stamp and so on, a TV with DVD for when I don't want to miss anything, lots of storage space and a slatwall where I can store more stuff.
The left page I used distress ink for the background and  put a loverly stamp from Tim on it.
Between the left and right page I added a page of a dictionary. Stamped the letters on it and distressed the edges after I torn them. In the bottom corner I stuck to paperflower on top of eacher and in the center I did with stickles.

 
On the right page, I've used a really nice font "Cheri Liney" that has a shadow of itself. But I decided to break apart and cut it in two seperate colors. In the lower right corner I've made a bow of lace that I had left over from the cover.


Tomorrows I've got two theme's for you!


Till tomorrow,
Sandra

Tuesday, September 27, 2011

Smashbook day 7: SannieLein

Hi bloggies!

Todays theme is SannieLein. I'll explain what that is. SannieLein is a project I started with a friend (I'm Sannie and Marjolein is Lein, that makes SannieLein). When I got my Cricut, I searched what it can do and I where I could use it for, and I discovered vinyl. I found it very expensive and you get two larges pieces of only one color. So I searched online and discovered that if you buy large quantities it isn't so expensive. We both saw business in it, and we bought it and sold it in smaller pieces. We offered it via Marktplaats (Dutch version of ebay) and we did alright, but not as good as we'd hoped. It was fun while it lasted. We handled itvery professionally, we even had color cards with pieces of vinyl on it, instructions and even business cards. We also created a website.


Okay about the layout, the background of the left page I distressed it with distress ink. I think I used 5 or 6 color on it. The stamp is from Tim and in the corner a fleur de lis. The color charts and instructions I attached to the page with a paper clip. I'm not sure if I'll leave it like that.


On the right page I've put a nice flower in the upper left corner next to our business card. In the lower right corner I stamped the Eiffel Tower of Tim Holtz with StazOn.
Beneath a photograph of the custom box I made for the vinyl. We had 10 colors.

Tomorrow you get a look of my craftroom!
See you tomorrow!

Sandra

Monday, September 26, 2011

Smashbook day 6: Cricut

Hi everyone!

Today's theme is Cricut. Because of Lein I learned about the Cricut. She had the first Cricut. She was so sweet to lend it to me. We had a crafty afternoon and the same afternoon I had SCAL (Sure Cuts a Lot) installed on my laptop and the Cricut was also made SCAL ready. It was a bit scary because we had read messages about that the Cricut after updating the firmware wouldn't work anymore. Luckily everything went well and we could play with SCAL. After some time I have purchased the Cricut Expression and was very pleased. Later I discovered MTC (Make the Cut) and I was completely happy. Too bad that ProvoCraft is so childish about the use of SCAL and MTC with the Cricut, that's one of the reasons why I switched to the eCraft.


The edges on the left page, I used Distress Ink on. I never really had many cartridges because with SCAL and MTC I could make anything I wanted. I always was fiddling with the cartridges. In my paper trash I found an old packaging with a Cricut logo on it. I cut it out and stuck it on the page.


On the right, I used as background to the Cricut cutting mat, great for journaling because of the lines.
Everything in this smashbook is cut out with eCraft, how ironic! LOL.
Tomorrow the theme is SannieLein. You see what that is tomorrow!

See you tomorrow!
Sandra

Sunday, September 25, 2011

Smashbook day 5: Hotfix and beads

It's day 5 and today I have two themes for you! How exciting! The two themes are hotfix, aka rhinestones, and beads.
I love sparkly things and when somebody introduced me to rhinestones, I was sold. At first I only used them to decorate my bags and then I made applications with it. It costs a lot of rhinestones to make a application, but it's so much fun to do. After that I started decorating t-shirt's and  soon I sparkled in my decorated clothes with matching bag:). Nowadays  I use rhinestones for decorating cards. It gives a very nice effect.

I was quite busy making and decorating bags and I wanted to make a cute hanger for  my bags, so I looked for beads and charms. Soon I had a new hobby: beading. I'm kind of a hamster when I start a new hobby, because I want lots of choices and therefor I start to hoard, lol.


For the Hotfix page I've used for the background three colors of distess ink. And in the background on the left I used a handwriting stamp from Tim. The letters Hotfix are made with rhinestones and in ​​the second picture it shows you how I have done that.

 
The "Beads" page I have some examples of my homemade jewerly and I use a cabinet with tiny drawers for all my beads. On the hinges I used embossing powder for the look, but also for a bit more strength. On the other side of the cabinet, I stamped the crown with Distress Ink and I brushed perfect pearls on it, put the excess pearls ​​back in the container and rubbed the remaining excess off with a cloth. Tadaaa!

The theme for tomorrow is the Cricut!

See you tomorrow!

Sandra

Saturday, September 24, 2011

Smashbook day 4: Bags!

Hello everyone,

It's day 4 of the smashbook adventure. Yesterday I revealed the theme of today : Bags!
I'd never thought I would make anything else than stuff for Wall-E. When I saw a homemade bag in a great fabric store I bought the pattern after some doubt. I wasn't sure I could pull it off. The same evening I finished the bag! Whoohoo!! I liked it very much and I was foolish proud of myself, haha. Soon I got some ideas to expand the bag with pockets and stuff. Eventually I got a great idea (if I do say so myself) by making the front flaps and shoulder band changeable. So I just need a basic bag and by making a new front flap and a maybe a shoulder band I've got a new bag! The front flaps of the bag have velcro on them as well as the inside of the basic bag. So they're easy to change.
On the left, I have some of my front flaps.I've got about 35 flaps...

 
I used distress stain picket fence on the corners. The letters I cut out of vinyl. It was a tricky job to get them on the paper, because they're so thin. It was was not so smart to write on such a busy background. The bags on the right page are the same ones, and a different kind than de basic bag with changeable flaps :).


Tomorrow two themes!
Until tomorrow.
Sandra

Friday, September 23, 2011

Smashbook day 3: Sewing machine

Hi everyone,

It's already day 3 of my smashbook project . I just counted the pages and there are 18 total, so after this one 15 more to go! So stay tuned, haha. Today it's about my sewing machine. When I making the houses and mats to for Wall-e, I wanted my own sewing machine. The first fabric fair where I went, they had a stand of Bernina and the gave me a demo of the machine. I was sold. A few days later I went and picked it up with a friend of mine.
Okay, this layout is quite simple. On the leftpage I cut the folder about my sewing machine and I stitched the edges with my Bernina. I distressed the post-it  with distress ink. In the envelop I put a label.


On the right page, I cut out the sewing machine with my eCraft distress ink and colored it with distress ink. In the right corner I put a rub-on from KaiserCraft. And I put a ribbon at the top of the page. How cute! haha.


The theme for tomorrow: Bags!

See you tomorrow!
Sandra

Thursday, September 22, 2011

Smashbook day 2: The beginning

Hello everyone,

It's day two of my smashbook project. The theme of today is "the beginning". About 2.5 years ago I started being creative. Actually it all started with my pet rat, Wall-e. You can get very nice hammocks and houses for rats, but they're a bit pricey and it didn't seemed so difficult to make it yourself. So I decided to give it a go. I didn't have a sewing machine, but my mother did. I was happy that she let me use her sewing machine and learned me the basics. After some time alot of  practice I got the taste for it. Quickly Wall-e's cage was filled with homemade hammocks and houses. He was very happy with all of them and loved every new addition to his cage.
Unfortunately Wall-e passed away a year ago. But he's always on my mind and I'm very grateful for his influence on me.

Okay, back to the order of the day! On the left page, the stamp in the background is from Tim Holtz, the photos I printed with my inktjet printer on plain paper and the sides are decorated with distress ink, the same for the post-it.
I made ​​my own rub-ons, the text "Remember" and "Always in my heart".  I've made them by printing the text on sheets with my inkjet printer. And rubbed them on the pages. The text must be mirrored.


On the right page in the top left corner, I made a swirl that I cut out with my eCraft machine and I used distress stains and ink on it. Then I put the crown on top. The crown is a stamp from Tim Holtz.


Tomorrow a new page!
Until tomorrow.
Sandra

Wednesday, September 21, 2011

Smashbook day 1: Inspiration

Hi everybody,

It's day one of my smashbook adventure. The first two pages are about what inspires me in crafting. I like to be creative and making beautiful things. At the moment I like to stamp and make the distress techniques my own. And I'm practicing with this smahbook.
 

For the left page I cut out tags with my eCraft on regular paper (120 grams). The tags I found in the library from Make the Cut (MTC). For the background i used distress ink (antique linnen, victorian velvet, dusty concord, vintage photo, walnut stain)  and printed the text on it with my inktjet printer afterworths.


On the right page I cut out the letters and shadow with my eCraft and used distress ink on each letter. Also the old paper tag I cut out and used distress ink (antique linnen, victorian velvet, tea dye)  on it. The key is a rub-on from Kaisercraft (Treasures).
The paper I used for this smashbook is First Edition Papers (Sweet Owl) and paper from a discount store.

Till tomorrow!
Sandra

Tuesday, September 20, 2011

My own version of a smashbook

Love the smashbook concept. For this you can use all your scraps and embelishments you've laying around. I don't have much with journaling and pictures, but when I started this project I became hooked. I decided to do a smashbook from when I started with crafting till now and cover all the hobbies I picked up along the way.


I'm going to make a page in my smashbook a day and publish it when it's finished. So I hope you'll enjoy it and will follow it along the way.

Sandra

Saturday, September 17, 2011

Organizing!!

Hi everyone!
Recently I been busy organizing my new purchases and going crazy with my new hobbies. I noticed that my workspace became a mess quickly. I don’t like it when it’s a mess, because I get distracted. But I found a solution for that problem.
I had my stuff in high boxes, but I found out that it is much better and easier if  the box is a lot lower, so I can see better what’s in the box and can take it out easily. The trick is to put it back in it's place when I'm finished... I am completely happy with my idea, the stuff can stay in it’s place and is easily reachable. Nice and organized, great!
This month I also promised myself not to buy new things. I get a bunch of Tim Holtz stamps and distress ink within next week, but that's already been paid:). In October, I'm on budget and in November during the “Kreadoe” convention I can go beyond my self LOL. I’ve got to save up for that... hahaha yeah right!
Sandra

Friday, September 16, 2011

Slatwall rearranged

Hi everybody!
On “Marktplaats”, a dutch version of ebay, I found  storage boxes for scrapbook paper that is compatible with my slatwall, and they were just 1 euro each! Unfortunately, they are second hand, but that's fine. I've ordered too much, because I was afraid that I could no longer could get them. But they are very unstable and don’t know how long they will last, so they will come in handy as replacements, I'm sure. With the arrival of these containers and the wire basket, I decided to rearrange my slatwall. It's not entirely reorganized, but I made ​​room for new things. Here are some pictures.

Sandra

Thursday, September 15, 2011

Distress ink box

Hello!
On the blog from France: http://papillon-sur-la-branche.blogspot.com/ I saw a very nice upstanding storage box with doors for distress inkpads. How cool?!
But then I saw the distress ink box (at the bottom of the page) and for me it was a bit more practical. Besides I don’t know where I can get the hinges and closure for the upstanding storing box with doors. I have searched the internet, but I can’t find anything. So last night I set to work to make my version of it.
Below is the result of my ink-storage case:
       
It's not quite ready. I also want to decorate the inside and stick lots of fun stuff on it. I've to make another one and if I'm buying all inkpads then two. On the blog where I got the idea from, you can also do workshops, but I think it is in the French part of Belgium. Unfortunately not an option for me. Because I can use some lessons:). Oh well,  practice makes perfect ;).
Sandra

My first real blog

Hi everybody!

My name is Sandra and this is my first real blog for you all to see:). I had a private blog, more like a digital creative journal. But this one is for you guys. Do you still follow? Never mind haha.
I have many hobbies, but lately I am busy with card making, stamping and other paper projects. I really like the stuff from Tim Holtz’ line and his techniques are amazing. Currently I’m experimenting with his techniques and loving it very much.
My goal is to post a message with what I've discovered or created at least once a week.
And now a first message from the last project I've done.
Have fun reading my blog!

Sandra